Practical Tips How to Reduce EMI in Buck Converters
AN076
Mitigating electromagnetic interference (EMI) is a common issue in switch-mode buck converters. EMI is usually caused by high-frequency current flow. This application note discusses EMI problem that arises from input currents and proposes a solution and different methods for EMI reduction. Towards the end, a practical guide on constructing simple EMI measurement tools is introduced, as well as insightful advice on how to effectively utilize these tools for testing purposes.
1 The Cause of EMI and its Solution
EMI in switch-mode buck converters is mostly caused by high frequency currents flowing in circuit loops.
Figure 1
The input current I1 has very high dI/dt, and can generate a lot of EMI over a broad spectrum. Area A1 as shown in Figure 1 should be made as small as possible. Cin should be placed as close as possible between IC VIN pin and GND pin, see Figure 2.
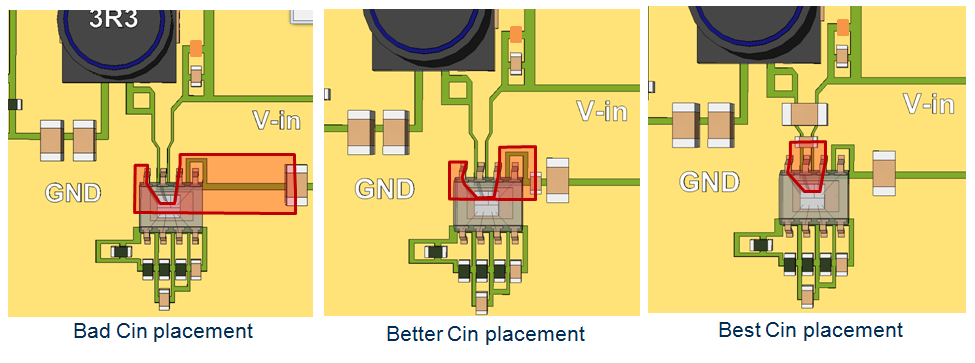
Figure 2
2 Other Ways to Reduce EMI in Buck
Converters
|
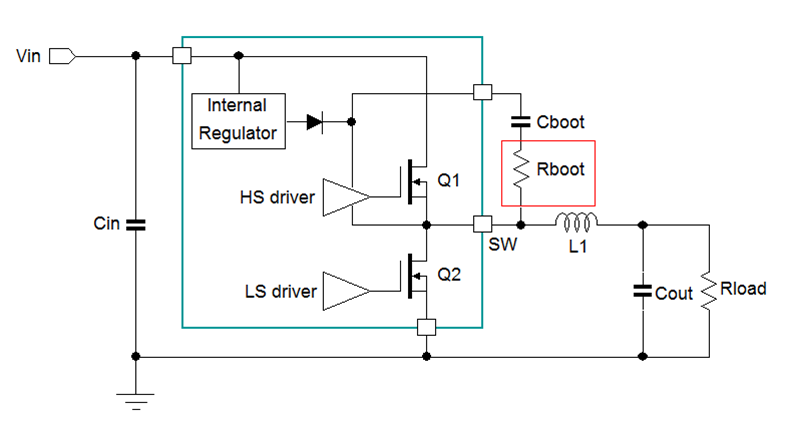
Figure 3
|
Add a resistor Rboot in series with Cboot as shown in Figure 3.
Rboot reduces the switch-on drive current of Q1, which increases the rise time of switch waveform, which reduces the higher harmonics of the switching current. The value of Rboot depends on the size of the high side MOSFET. For most applications around 5 ~ 10Ω is used. For smaller (higher Rdson) MOSFETs, larger Rboot values are allowed. Note that the slower MOSFET switch-on will increase switch losses and reduce efficiency.
|
|
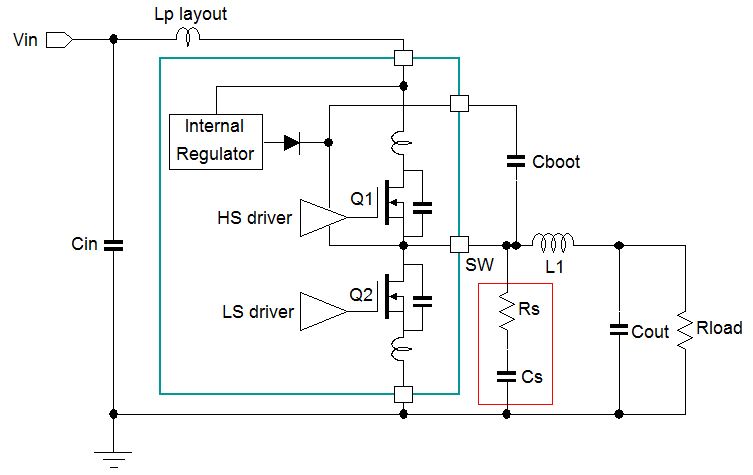
Figure 4
|
Add an RC snubber as close as possible between switch node and power ground.
Rs will damp to the parasitic resonant LC circuit which consists of MOSFET capacitance and the parasitic inductance of the switching loop as shown in Figure 4. The optimal value for Rs depends on the total switch node capacitance and parasitic inductance. Rs normally ranges from 2.2Ω to 10Ω.
The series capacitor Cs is chosen 3 ~ 4 times larger than the circuit parasitic capacitance. 470pF ~ 1nF is usually sufficient.
After placing the RC snubber, be sure to check the total power loss of the circuit : The converter efficiency will drop, especially at high switching frequency and high input voltages.
|
|
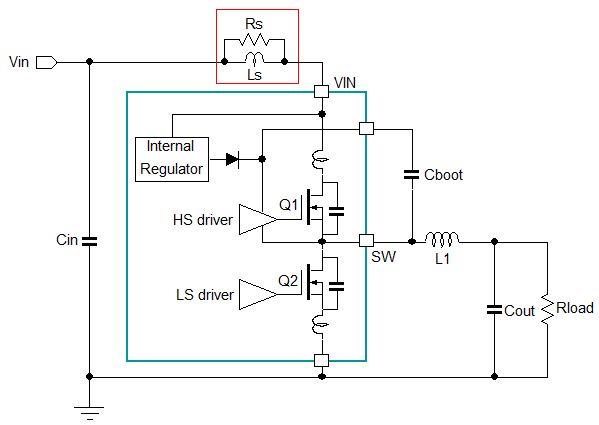
Figure 5
|
Add an RL snubber in series with the resonant circuit as shown in Figure 5. This will add a small amount of series resistance in the resonant circuit, sufficient to provide some damping. Ls can be a very small HF bead like BLM15AX100SN1 or BLM15PG100SN1 and must have sufficient current rating for the input RMS current. Rs normally ranges from 2.2Ω ~ 4.7Ω.
The RL snubber must be placed close to the power stage input node, keeping the input loop small. One drawback of the RL snubber is that it creates impedance Rs in the switching loop the high frequency region. During the very fast switch transitions, the switch current pulse will create a short voltage glitch across Ls//Rs, resulting in a small voltage glitch on the power stage input node. Be sure to check the voltage glitch on the IC VIN node during maximum load switching when the RL snubber is added.
|
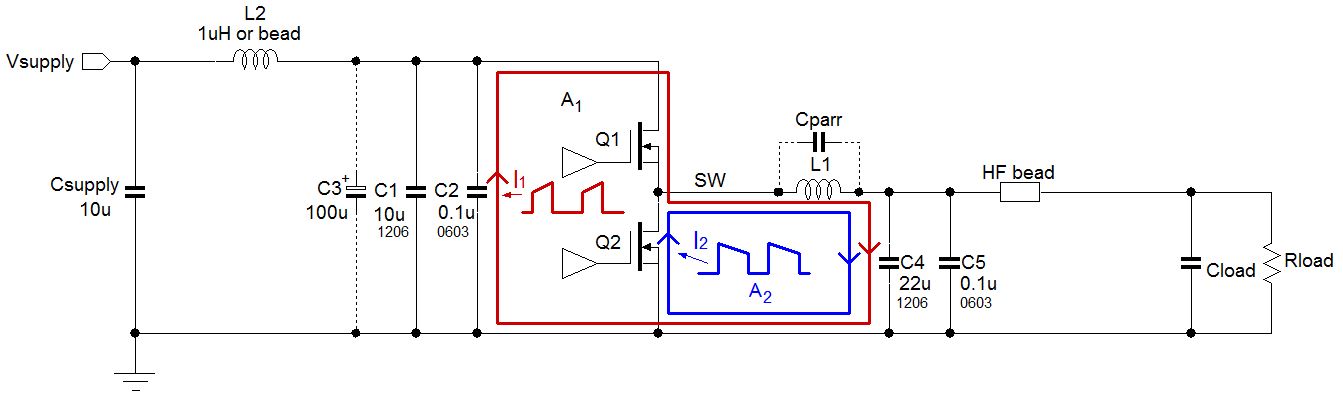
Figure 6
Input filtering is very important to reduce EMI. To reduce the voltage drop across Cin, use low ESR MLCC types and multiple capacitors of different size like 2x10µF 1206 and one 22n ~ 100nF 0402 or 0603 size type close to the buck IC. To reduce the noise in the input loop, it is highly recommended to add extra L-C filtering in the input line. When using pure inductance for L2, it may be necessary to add the electrolytic capacitor C3 to damp any input supply ringing and ensure stable input supply.
3 Simple EMI Measuring Tools You Can
Build Yourself
You can do near-field EMI measurements on the PCB by using a small loop antenna. A small electrically shielded loop antenna can be easily made yourself using a length of thin 50Ω coaxial cable: see Figure 7.
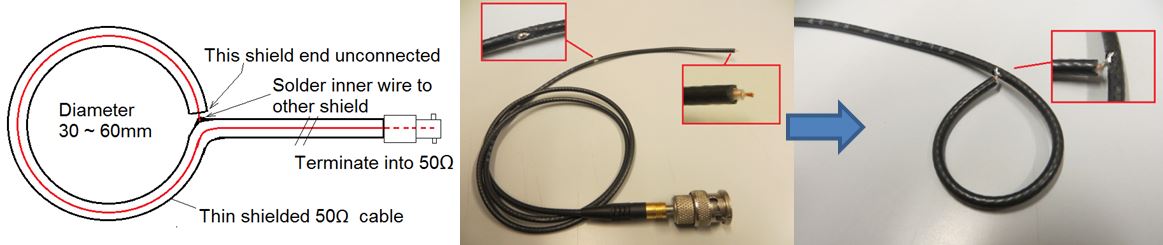
Figure 7. High Frequency Current Loop
The loop antenna can be connected to a spectrum analyzer and by moving the loop over the PCB of your application, you can see which areas emit a lot of high frequency magnetic field. You can also connect the loop antenna to an oscilloscope (terminated in 50Ω) and the oscilloscope will show switching noise levels in certain areas of the PCB. By keeping the loop at a fixed distance and place, and making some changes to circuits/PCB loops, you can check whether radiated noise levels will increase or reduce.
The high frequency current in the converter input wiring is a good indication of radiated EMI. You can make a high frequency current probe by placing a couple of windings on an EMI ferrite core: these will form a high frequency current transformer. Construction is similar to the loop tool, but now the loop has 3 turns around the ferrite core. See Figure 8.
Figure 8. High Frequency Current Probe Construction
The high frequency current in cables can now be measured by passing a cable through the ferrite core. The current transformer output can be connected to spectrum analyzer or oscilloscope (terminated in 50Ω).
To avoid common mode current flowing from the tested device to the measurement equipment, it is recommended to add a common mode choke in the cable: this can be done by placing a clip-on EMI core with a couple of windings in the cable to the analyzer. The input common mode measurement is shown in Figure 9.
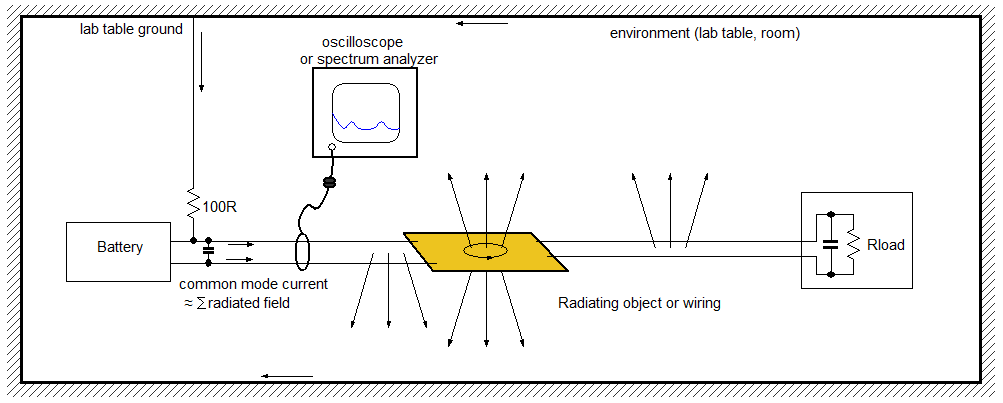
Figure 9
For more information, please read the full application note Reducing EMI in buck converters
To stay updated with more information about our products, please subscribe to our newsletter.